Wednesday 27 February 2013
Special ! - The Guitar Urinal
It's time to retire your axe! Now all you need to rock on is a six pack and one of these:
http://www.guitarpee.com/
Saturday 23 February 2013
Confession #6 - Warm Up! - Exercise #1
When you are young, your body will let you get away with a lot. I'm sorry to tell you that as you get older, it won't do that anymore. If you are an older player, you need to warm up before playing. If you are a younger player, it's a good habit to get into now, rather than trying to break 20 years worth of bad habits when you are older. And yes, even the pros warm-up before a gig.
Also remember to take a short break every 45 minutes or so and give your fretting a hand a rest.
FRETTING HAND
Playing guitar can be hard on your fretting hand, especially if you are playing songs with lots of barre chords. Barre chords require you to hold your hand in an awkward position and then squeeze with a lot of force. That can be hard on your wrist. So rather than starting by picking up your guitar and slamming out The Ramone's Blitzkrieg Bop, take a few minutes to warm up your hand first.
I'll talk more about barre chords in a future Confession.
First, Some Single Notes
I have a few different exercises that I use for warm-up. They can be played anywhere on the fretboard, but I usually start them in 5th position (i.e. at the 5th fret). This is because 5th position is probably the post comfortable position to play at on the whole guitar. Your wrist is not cocked one way or the other, and the spacing between the frets is just right.
Warm Up! - Exercise #1 is a simple chromatic run. It doesn't sound particularly musical, but that's not its purpose. Play it slowly. As your hand limbers up, you can gradually increase the tempo. Remember, the point is to warm up, not to shred. Also, use light pressure with your fretting hand. Don't try to strangle the guitar's neck! Using light pressure will also benefit you by forcing you to be more accurate about your finger positioning behind the fret.
I actually like to start by playing each note twice, like this:
This slows down the changes and gives your fingers a chance to get up to speed. Then I do single notes.
The other benefit of Warm Up! - Exercise #1 is that the descending phrases (i.e. 8-7-6-5 etc.) help develop your finger 3-4 independence (finger 4 is your pinky). I'll talk more about finger 3-4 independence in a future Confession.
Now Some Chords
When playing the single note warm up exercises, only one finger is under tension at a time. After I've finished my single note exercises, I like to switch to some open chord work. This will put 2 or 3 fingers under tension simultaneously. So pick your favourite strumming song and gently play through it. Your fretting hand should be warmed up now.
Mix It Up
Warm up exercises get boring fast! When they do, your mind starts to wander and then you start making mistakes. So don't stay on any one exercise too long. Mix it up! I'll provide some more warm up exercises in future Confessions.
SHOULDERS
Dunno if its just me, but my shoulders sometimes get stiff when playing. So I like to do some stretches beforehand. Stand up straight with your arms at your side. Keep your arms straight and raise them to the side until they are pointing at the ceiling. With both arms up over your head now, grab one hand with the other and gently stretch. Release and slowly lower them back down at your side.
(If this causes you any pain or discomfort, stop immediately!)
Next Week's Confession - Use Pivot Chords!
Also remember to take a short break every 45 minutes or so and give your fretting a hand a rest.
FRETTING HAND
Playing guitar can be hard on your fretting hand, especially if you are playing songs with lots of barre chords. Barre chords require you to hold your hand in an awkward position and then squeeze with a lot of force. That can be hard on your wrist. So rather than starting by picking up your guitar and slamming out The Ramone's Blitzkrieg Bop, take a few minutes to warm up your hand first.
I'll talk more about barre chords in a future Confession.
First, Some Single Notes
I have a few different exercises that I use for warm-up. They can be played anywhere on the fretboard, but I usually start them in 5th position (i.e. at the 5th fret). This is because 5th position is probably the post comfortable position to play at on the whole guitar. Your wrist is not cocked one way or the other, and the spacing between the frets is just right.
Warm Up! - Exercise #1 is a simple chromatic run. It doesn't sound particularly musical, but that's not its purpose. Play it slowly. As your hand limbers up, you can gradually increase the tempo. Remember, the point is to warm up, not to shred. Also, use light pressure with your fretting hand. Don't try to strangle the guitar's neck! Using light pressure will also benefit you by forcing you to be more accurate about your finger positioning behind the fret.
 |
| Warm Up! - Exercise #1 (Click to Enlarge) |
I actually like to start by playing each note twice, like this:
 |
| Warm Up! - Exercise #1 playing each note twice (Click to Enlarge) |
This slows down the changes and gives your fingers a chance to get up to speed. Then I do single notes.
The other benefit of Warm Up! - Exercise #1 is that the descending phrases (i.e. 8-7-6-5 etc.) help develop your finger 3-4 independence (finger 4 is your pinky). I'll talk more about finger 3-4 independence in a future Confession.
Now Some Chords
When playing the single note warm up exercises, only one finger is under tension at a time. After I've finished my single note exercises, I like to switch to some open chord work. This will put 2 or 3 fingers under tension simultaneously. So pick your favourite strumming song and gently play through it. Your fretting hand should be warmed up now.
Mix It Up
Warm up exercises get boring fast! When they do, your mind starts to wander and then you start making mistakes. So don't stay on any one exercise too long. Mix it up! I'll provide some more warm up exercises in future Confessions.
SHOULDERS
Dunno if its just me, but my shoulders sometimes get stiff when playing. So I like to do some stretches beforehand. Stand up straight with your arms at your side. Keep your arms straight and raise them to the side until they are pointing at the ceiling. With both arms up over your head now, grab one hand with the other and gently stretch. Release and slowly lower them back down at your side.
(If this causes you any pain or discomfort, stop immediately!)
Next Week's Confession - Use Pivot Chords!
Saturday 16 February 2013
Confession #5 - Use a Metronome!
... or a Drum Machine, or a Multi-Effects Pedal, or an Electronic Keyboard
An electronic keyboard has some additional benefits:
The most important thing to remember when using a metronome is to:
Know the part before playing with the metronome!
There's no point in putting a beat on until you know the part you are trying to play. If you are constantly starring at the TAB and still working on fingerings, the beat will just drive you mad and hinder your progress. You don't have to have the part fully memorized, but your fingers should already know where they want to go as your eyes move quickly over the TAB.
The other most important thing to remember is to:
KEEP IT SIMPLE

Next Week's Confession - Warm Up! - Exercise #1
One of the most important skills for any musician to develop
is a sense of rhythm. You may play
brilliantly, but if you can’t play in time with a metronome or other musicians,
then you'll be stuck in your basement forever. To some people, this skill
may come easy, while for others it will take some practice. But it can be learned.
PLAYING ALONG WITH THE RECORD IS NOT THE SAME THING
Now, just because you are able to play along with the record
doesn’t mean that you’ve mastered this skill.
When you play along with the record you have an example to follow and
are subconsciously picking up on other cues in the recording. None of these things will be present if it’s
just you and a metronome, or you and a bass player and a drummer.
METRONOME vs. DRUM MACHINE vs. KEYBOARD
Metronomes are really, really boring musically, but are also
pretty inexpensive. Consider stepping up
to a drum machine, or a multi-effects unit with a built in drum machine (I have the Digitech RP-250), or better yet an electronic keyboard (I have the Yamaha Portatone PSR-E403). All will provide you with a
variety of beats to practice with.
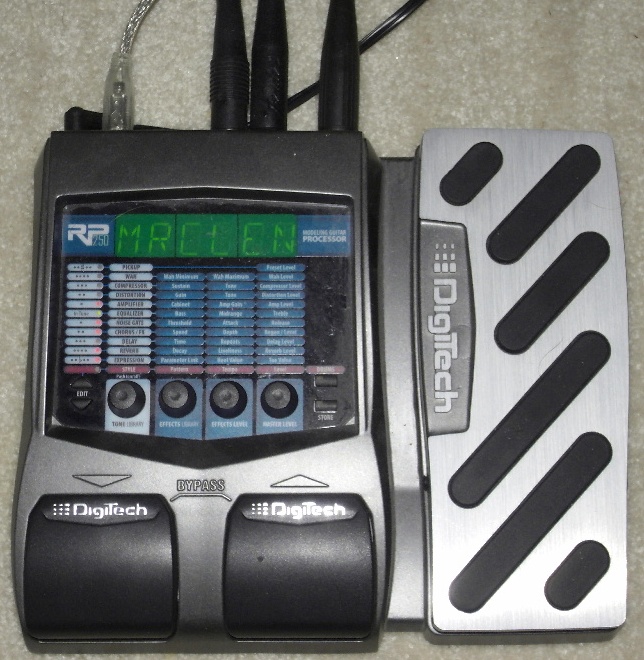 |
| Digitech RP-250 Multi-Effects Pedal |
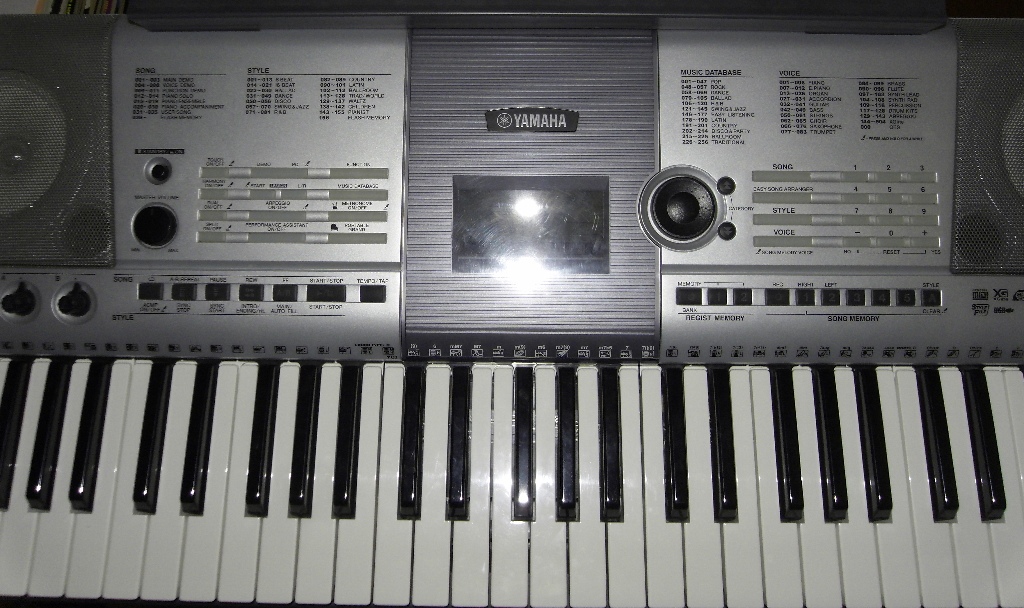 |
| Yamaha Portatone PSR-E403 |
An electronic keyboard has some additional benefits:
- If it has auto-accompaniment, you can use it for one chord jams in a variety of musical styles, and
- The piano keyboard can be a useful tool for learning and understanding musical theory because it has easily recognizable patterns. Patterns are harder to see on the fretboard, so this can make it hard to grasp musical concepts and relationships.
 |
| Spot the C Major Scale on the Keyboard |
 |
| Now find it on the Fretboard !?!?!? |
USING A METRONOME
Hopefully I’ve convinced you that using a metronome has
many benefits:
· It's like truth serum for your playing. If your rhythm is off, it will show.
·
It will help you develop a feel for a steady rhythm. You'll play better when there isn’t a beat available.
·
It's great for rythym training exercises (e.g. learning to play 16th notes at 100 bpm)
The other most important thing to remember is to:
Start Slowly!
If you set a tempo that is too fast, then you will make
mistakes. Worse, you will probably
persist at that tempo (You’re probably telling yourself that “I should be able
to do this!”) and keep making more mistakes.
What ends up happening is that you practice making mistakes instead of
practicing playing correctly. Don't practice making mistakes!
Start with a tempo that you can play comfortably at without
any mistakes. Stick at this tempo and
develop a feel for the part you are practicing and develop your muscle memory
for playing it correctly. Slowly speed
up the tempo, even if it’s only 4 bpm at a time. If you speed up the tempo and find yourself
making mistakes, go back to the original tempo and practice playing it
correctly.
Remember, you are not going to get a new part up to tempo in one evening. It may take several days of slowly increasing the tempo to get up to speed.
While you are developing a feel for rhythm, you need to keep
it simple and slowly increase the difficulty.
Start with just whole notes and strum a chord on every beat 1. If this is going well, then try strumming on
beat 1 and beat 3 (i.e. half notes).
Next step up to quarter notes (i.e. beat 1, 2, 3 and 4), etc.
Alternatively, stick
with whole notes, but change chords every time beat 1 comes around. Try
the following I-vi-IV-V7 progression in the key of G:
G-Em-C-D7
I’ll talk more about this progression in a future
Confession.
FINISH ON A HIGH NOTE
The last thing you hear is what’s going to stick in your
brain. This is why it is critical that you
finish your practice session by playing the new part you’re learning
correctly. It’s great to increase the
tempo during your practice session and push yourself, but always finish
your session by slowing it down to a comfortable tempo and playing the part
correctly. This is what your brain will
remember.
Next Week's Confession - Warm Up! - Exercise #1
Saturday 9 February 2013
Confession #4 - Change Your Strings!
Over time, your guitar's strings wear out due to dirt and oil from your fingers. When they do, they lose their tone. This happens gradually over time, so you don't really notice it. However, when you put a new set of strings on, you'll be amazed at the difference. You'll get back the brightness that you didn't know you had lost. A set of strings will only set you back around $5 or $6, so change your strings regularly.
Make sure you buy the same gauge strings as what's already on your guitar. Changing gauges changes the tension on the neck, causing it to become more concave or convex. When this happens you may need to adjust your truss rod (see Confession #3 - Set-up Your Guitar!).
A FEW POINTERS ON CHANGING STRINGS:
Next Week's Confession - Use a Metronome!
Make sure you buy the same gauge strings as what's already on your guitar. Changing gauges changes the tension on the neck, causing it to become more concave or convex. When this happens you may need to adjust your truss rod (see Confession #3 - Set-up Your Guitar!).
A FEW POINTERS ON CHANGING STRINGS:
- I like to change one string at a time, starting with the low E string. The reason for this will become apparent below.
- Loosen the tuning peg to take the tension off the string, then use a pair of wire cutters to snip the string near the tuning peg. You can then easily remove the remnants of the string.
- When threading the new string through the tuning peg, consider which way the peg will turn and thus which side of the peg the string will be on. I made this mistake once with my Fender Telecaster, which caused the nut to come unglued and shift a few millimeters from its intended position (see below).
- Some people like to tuck the loose end of the string under the string as they are winding it on the tuning peg, the theory being that the loose end is pinched when the string is under tension and therefore the string can't slip. Some people think that this is unnecessary and just bend the loose end back sharply at the tuning peg. I've tried both ways on my guitars and haven't noticed a difference.
- I don't have a great ear for pitches, so when I'm tightening up the new low E string and I think I'm getting in the neighborhood of the target pitch, I will fret the low E string at the 5th fret and compare the sound to the open A string (see Confession #2 - Tune Your Guitar! The two pitches should match.). If they don't match, I move up to the 6th fret, then 7th, etc. until the pitches match. This tells me how close I am and that my low E string still needs some tightening. If you've over-tightened the new string, then you'll have to fret the 4th fret, 3rd fret, etc. to get the pitches to match. This is why I change only one string at a time. It allows me to use the next highest string as a reference pitch.
- Use an electronic tuner for fine tuning the new string.
- New strings will stretch, causing the string to go flat, so don't stop yet. Execute a series of whole step bends (or more) all along the fretboard and then re-tune the string. Repeat this until bending the string no longer causes it to go flat when played open. You don't want your strings to stretch while you're playing, so take all of the stretch out of them when you first put them on the guitar.
- Always tune-up to the correct pitch, never down (see Confession #2 - Tune Your Guitar!)
- NEVER CHANGE STRINGS ON THE SAME DAY AS A GIG !!!
 |
| Fender Telecaster headstock Note how strings all go to the right of the tuning pegs and how the string is in a straight line before and after the nut. |
Next Week's Confession - Use a Metronome!
Saturday 2 February 2013
Confession #3 - Set-up Your Guitar!
If your guitar is not set-up properly, a few things can
happen.
One: Your guitar may
be perfectly in tune at the nut (i.e. the 0th fret), but it will get
progressively more out of tune the further up-the fretboard you play (i.e. the
open E on your sixth string will be in tune, but the E at the 12th
fret on your sixth string will be sharp or flat.). Adjusting your guitar so that it is in tune
along the entire fretboard is known as adjusting the intonation.
Two: The further up
the fretboard you move, the more your fingers feel like they are walking in
deep snow. This is because the neck of
your guitar is not adjusted properly and is slightly concave. Adjusting your guitar so that the fretboard
is neither concave nor convex is known as adjusting the truss rod. The other possibility is that the saddle height at the bridge needs adjusting.
Three: When playing
fretted notes at the low end of the fretboard, the string will sound the note,
but also makes a buzzing sound. This is
because the neck of your guitar is not adjusted properly and is slightly
convex. Adjusting your guitar so that
the fretboard is neither concave nor convex is known as adjusting the truss
rod. The other possibility is that the saddle height at the bridge needs adjusting.
So a guitar that is not set-up properly will not sound good
and will be difficult to play, which will make for a frustrating experience for
a beginner. Thus, the first thing you
should do after you buy your first guitar is get is set-up. This will set you back $50 to $75. This may sound a bit steep if you only spent
$200 on your guitar, but it's worth it for the frustration it will save you.
ADJUSTING THE
INTONATION
Why is it that your guitar can be in tune at the nut and out
of tune at the 12th fret? A
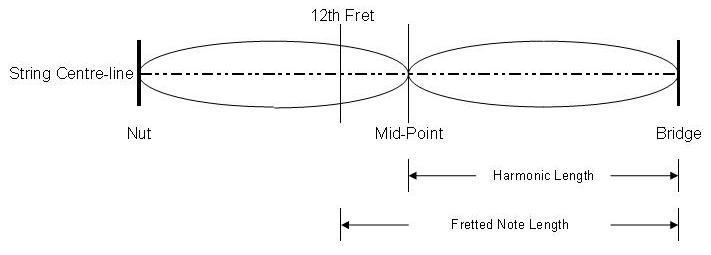
little bit of physics comes into play here.
When you pick an open string, the string vibrates in one continuous arc
that starts at the nut and ends at the bridge.
The frequency of the low E string played open is ~ 82 Hz

If the string vibrates twice as fast, there will be two arcs,
the first between the nut and the string’s mid-point, and the second between
the mid-point and the bridge (see footnote).
At the mid-point of the string, there will be a node (i.e. a point where
the string is not moving). The note you
now hear is the first octave above the sound of the open string.
Vibrating twice as fast, the frequency produced by your low
E string will now be ~ 164 Hz (i.e. it doubles). So when you play the note at the 12th
fret of your low E string, what you should hear is the E one octave higher than
the open string (because the 12th fret is meant to be the octave).

But what if the mid-point of the string is not centered over
the twelfth fret? Then the note you hear
when you play at the twelfth fret of your low E string will not be the octave, and instead will either be sharp or
flat. To get that note in-tune, you need
to centre the mid-point of the string over the twelfth fret. This is done by adjusting the length of the
string at the bridge.
Daddy, What’s a Harmonic?
Now, how do you know whether to lengthen or shorten the
string? To answer this question, you
first need to learn how to play a harmonic.
Place your finger so that it is lightly touching the string at the 12th
fret (do not press down and fret the note!).
Pick the string. What you hear
will be an octave higher than the open string.
When you pick the string, it normally vibrates in one
continuous arc. Placing your finger
lightly on the string at the 12th fret creates a node and forces the
string to vibrate with two arcs. The
notes resulting from forcing nodes like this are called harmonics. There are several of them on your
fretboard. Now that you know what a
harmonic is, let’s go back to figuring out if our string is too long or too
short.
Don’t ask for Shorter Strings at the Guitar Store!
If the true mid-point of the string is below the twelfth
fret, then the harmonic will have a longer arc than the fretted note at the 12th
fret and thus will have a lower pitch.
So if the harmonic is a lower pitch than the fretted note, you need to
lengthen the string. This will move the mid-point towards the bridge (and the 12th fret).

If the true mid-point of the string is above the twelfth
fret, then the harmonic will have a shorter arc than the fretted note at the 12th
fret and thus will have a higher pitch.
So if the harmonic is a higher pitch than the fretted note, you need to
shorten the string. This will move the mid-point towards the nut (and the 12th fret).
To test this, you will need an electronic tuner (see Confession #2 - Tune Your Guitar!).
Methods of adjusting the string length will vary from guitar
to guitar as different manufacturers use different kinds of bridges. Consult your manufacturer’s website for
guidance for your particular bridge. In some cases it is not
possible to adjust the intonation due to the bridge design. Most acoustics (if not all) are not
adjustable.
 |
| Fender Telecaster Bridge Intonation is adjustable for each string. Note the hex-key screws for adjusting saddle height. |
 |
| Paul Reed Smith SE Custom Bridge Intonation is not individually adjustable for each string, but the bridge position relative to the two set screws can be adjusted. |
 |
| Yamaha APX 500 Bridge Intonation is not adjustable. |
When you're done, the mid-point of the string will be centered over the 12th fret, like this:

This next tip is in big bold letters because its very important.
Because you've changed the length of the string, the open string will need to be re-tuned when you've finished adjusting the string's intonation!
You're done. Enjoy your properly intonated and freshly tuned guitar!
Footnote: You can
see this visually if you take a long piece of rope and anchor one end to a
stationary object, like a tree. Hold the
other end in your hand and with the rope taught, shake your hand up and down
until you see the aforementioned continuous arc. It’s called a standing wave. Now move your hand up and down faster and
faster until you see the pair of arcs, with a stationary node in the middle.
ADJUSTING THE TRUSS
ROD AND SADDLE HEIGHT
Inside the neck of your guitar is an adjustable rod, called
the truss rod. This is used to adjust
how concave or convex the neck of the guitar is.
If the neck is concave, the strings will sit high off the
fretboard and you’ll find it difficult to move from string to string. Your fingers will feel like they are walking
in deep snow.
If the neck is convex, the strings will sit low to the
fretboard and may buzz against higher frets (e.g. you playing the C at the 3rd
fret of the 5th string and the string buzzes against the 4th
fret when you play the note.
Of course, if the saddle height is not set properly, this can also cause the same problems.
Adjusting the truss rod is something best left to an experienced
guitar tech. If you adjust it too much
one way or the other, you can damage the neck.
Knowing whether the truss rod needs adjusting, or the saddle height needs adjusting, or both, is again something that is best left to an experienced guitar tech. If you don't know what you're doing, you could just end up making things worse.
Knowing whether the truss rod needs adjusting, or the saddle height needs adjusting, or both, is again something that is best left to an experienced guitar tech. If you don't know what you're doing, you could just end up making things worse.
Next Week's Confession - Change Your Strings!
Subscribe to:
Posts (Atom)